


Air tracks are essential equipment for gymnasts, providing a soft and safe surface for practicing various skills. In this comprehensive step-by-step guide, we will walk you through the process of setting up an air track efficiently. Whether you’re a beginner or an experienced gymnast, follow these instructions to ensure a successful setup and maximize your training sessions.
Prepare the Surface for an Air Track
Before setting up an air track, it’s crucial to find a clean, dry, and flat surface with a gradient no greater than 5%. Follow these steps to prepare the surface:
- Clear the area of any debris or obstacles.
- Ensure the surface is completely dry.
- Verify that the surface is level, without any significant inclines or slopes.
Inflating the Air Track
To properly inflate an air track, follow these instructions:
- Remove the air track from the carry bag and unroll it completely.
- Take note of how the air track was rolled, as you will need to roll it back up the same way after use.
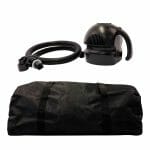
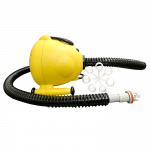
- Attach the hose to the inflated side of the air pump (located next to the power switch labeled ‘OUT’ or ‘INFLATE’).
– If using an electric pump, ensure it is suitable for inflation and not designed for continuous use.
– If using a foot pump, follow the manufacturer’s instructions.
Air Track Storage and Deflation
After using an air track, proper storage and deflation are essential to maintain its longevity. Follow these steps:
- Clean the surface of the air track from any dirt or debris and allow it to dry completely.
- Remove the valve security cap and push the valve pin in to deflate the air track naturally.
– Avoid using the electric pump for deflation to prevent damage.
- Roll the air track from the opposite end of the valve to allow any remaining air to escape.
– Avoid rolling it too tightly to prevent abrasions or tears.
- Once the air track is rolled and all the air is removed, push the pin back out to close the valve and put the valve security cover back on.
- Store the rolled air track in a dry location, preferably inside the provided carry bag.
Benefits of Air Tracks
Air tracks offer numerous benefits for gymnastics training:
- Safe and Confidence-Building: The soft surface of an air track allows gymnasts to practice new skills with confidence, reducing the risk of injuries.
- Versatile Training: With an air track, gymnasts can practice a wide range of skills, including stand-alone moves like backflips and cartwheels, as well as tumbling exercises.
- Indoor and Outdoor Use: Air tracks can be used indoors year-round and can also be taken outdoors during the summer months.
- Portability and Convenience: The AirTumble™ Air Track comes with an electric pump, repair kit, and carry bag, making it easy to transport and set up anywhere.
When setting up an air track, it’s important to follow the manufacturers instructions and ensure the surface is suitable for training. Always remember that air tracks should be set up by a competent person and used under the supervision of a qualified instructor. By following the manufacturers guide, you can enjoy safe and effective gymnastics training sessions on an air track.